Usage
Overview
Freddy Render has three distinct modes: Master, Slave, and Client. You can launch all three modes on the same machine, if you'd like. But typically in a renderfarm-like setup, you'd want something like this:
- One machine running Master mode, to control everything and expose a nifty web interface.
- One or more machines running Slave mode, to do all the rendering.
- Your personal workstation running Client mode, only when you need to submit a new job to the Master.
Each of these three modes is started with a simple command line.
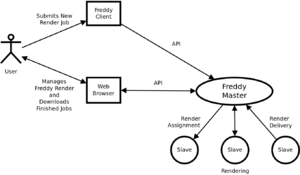
The subsections below will go into the modes in a bit more detail, as well as tell you how to launch them. You can see a general overview of the flow of control by viewing the image to the right.
In all examples, suppose MASTER_IP represents the IP address of the machine running Freddy Render in Master mode, and MASTER_PORT represents the port you'd like the Master to listen on (an integer usually between 1025 and 65535).
Master Mode
In Master mode, Freddy Render coordinates all activities and allows you to manage your jobs through a nifty web interface. You typically should only run 1 machine as the Master.
Life Cycle
A typical life cycle of your master might look like:
- Install to some server that you can keep running 24/7 forever.
- Configure Master mode to boot with that machine.
- Launch the Master for the first time (directly or by rebooting the machine).
- Leave running forever.
Invocation
Invocation of the Master is as simple as:
java -jar /path/to/FreddyRender.jar --master --port MASTER_PORT
Web Interface
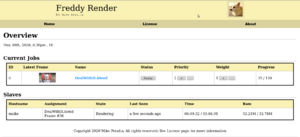
To access the web interface, just open your browser and punch in the address of your Master. To tell your browser what port to connect to, use a colon (:) followed by the port number. The general form is:
http://MASTER_IP:MASTER_PORT/
Depending on your own personal network configuration and the port you chose for your Master, an example of the URL in your browser might look something like the following:
http://192.168.1.100:8000
Also see the page Web Interface for more information on using the Web Interface.
Always-On
The Master would typically run 24/7, or at least until your project finishes rendering. The machine running your Master doesn't have to be very powerful, because it won't do any rendering. A simple Raspberry Pi 4 or old laptop would probably be fine.
However, it is acceptable to power off the Master sometimes, if you really need to. The next time you start the Master, it will scan the local file system and try to recover where it left off. Be aware though, that powering off the Master has some significant drawbacks:
- Whenever you start the Master again, it will cost some time to recover your previous jobs. If you have many jobs with many frames each, this could be a significant time delay where the Master seems unresponsive while starting.
- None of your Slave machines will be able to render anything when the Master isn't running. They'll sit idle while they endlessly try to contact the Master for instructions.
- No Clients will be able to submit new jobs.
Security
Master mode has no security as of yet, so you should only run this on a private network that you trust. It's also possible to run the Master behind Apache with a reverse proxy running SSL and some sort of authentication. If you run Master mode as-is on an untrusted network (e.g., the Internet), you might get random people submitting offensive jobs or deleting yours, just to troll you. Also, because development of Freddy Render hasn't focused on security concerns thus far, it's possible an evil Internet person could find a way to exploit Master mode to hack the entire machine. In other words, it's not worth making public; Just keep it safe on your own network.
Slaves On Different Networks
If you must utilize some Slave machines that reside on different networks than the Master, one potential idea is to run a VPN server/client configuration to securely connect the networks together. You should still be sure all networks can be trusted.
One free and popular VPN implementation you may want to try is OpenVPN.
Slave Mode
Slave mode is where all your jobs actually get rendered. You'll want to run as many machines in Slave mode, as you can get your hands on. Slave machines will continuously ask the Master for a frame to render, render the frame, then send the rendered frame back to the Master. When there is no work to do, a Slave will sit mostly idle until the Master finally has work it can do.
Life Cycle
A typical lifecycle for a Slave might be:
- Start the slave
- Keep it on endlessly
- Occasionally turn it off when you really need to, or when you're not rendering any Blender jobs.
Invocation
Invocation of Slave mode is also fairly simple:
java -jar /path/to/FreddyRender.jar --slave --host MASTER_IP --port MASTER_PORT
Shutting Down Slaves
Slaves can be shut down and started again whenever you need. When a Slave is shut down while rendering a frame, the Master will eventually realize what has happened and send the frame to a different Slave (if any). There are no other significant adverse effects of shutting down a Slave without warning.
If no Slaves are running, the Master will wait patiently until one comes online.
Client Mode
Client mode is responsible for submitting new jobs to the Master. You don't need to run Client mode unless you need to submit a new job to the Master.
Life Cycle
A typical life cycle for using Client mode would be:
- Launch the Client on your Blender workstation.
- Use the Client window to submit a Blender project to the Master.
- Close the Client.
Client mode can be launched on any machine with a graphical desktop, but this would usually be the machine you do your Blender design on since that's where your project files would be.
Invocation
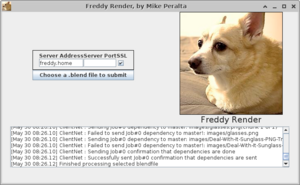
In Client mode, Freddy Render will launch a window you can use to submit jobs to the Master. Invocation is as follows:
java -jar /path/to/FreddyRender.jar --client --host MASTER_IP --port MASTER_PORT
In fact the "--host" and "--port" arguments are totally optional. All they do is initialize some fields in the window that spawns.
Submitting a Job
The only purpose of Client mode is to submit new jobs. The process is very simple:
- Make sure the Server Address and Server Port fields both point to your Master instance.
- Make sure SSL is checked if-and-only-if you have the Master sitting behind SSL.
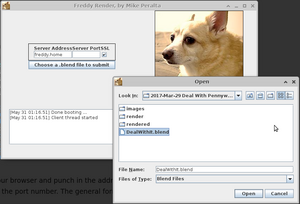
- Click the only visible button: Choose a .blend file to submit.
- On the dialog that pops up, locate and select the .blend project file you wish to upload.
- Click the Open button on the dialog.
- Watch the progress bar and log window for an indication that your project has finished uploading.
Security
Freddy Render has no real security as of yet, so you should only run your render farm on a private network that you trust. If you run Master mode as-is on an untrusted network (e.g., the Internet), you might get random people submitting offensive jobs or deleting yours, just to troll you. Also, because development of Freddy Render hasn't focused on security concerns thus far, it's possible an evil Internet person could find a way to exploit Master mode to hack the entire machine. In other words, it's not worth making public; Just keep it safe on your own network.
A tiny amount of privacy could be gained by running the Master behind Apache with a reverse proxy running SSL and some sort of authentication. But as of 2020-May-31, Freddy Render doesn't have any built in authentication, so a malicious Internet-person could still take control at any time.
Common Arguments
Some command line arguments aren't specific to only one mode, so they're listed here.
Host and Port
The --host argument specifies the hostname or address of the Master, and can be used on Client and Slaves modes.
The --port argument specifies the Master port, and is used on all three modes.
Connecting via SSL
If you have setup your Master behind an SSL server (e.g., using an Apache Reverse Proxy with SSL enabled), you can also use the command line argument "--ssl" when you invoke your Client or Slave machines, like so:
# Invoke a Client
java -jar /path/to/FreddyRender.jar --client --host MASTER_IP --port MASTER_PORT --ssl

# Invoke a Slave
java -jar /path/to/FreddyRender.jar --slave --host MASTER_IP --port MASTER_PORT --ssl
This essentially has the effect of having your machine connect with the https protocol instead of http.
Specifying a Blender Binary
The Master and Slave modes should use the same version of Blender that you used to create your Blender project file. If the default blender installation for each machine is the same version, you don't need to specify which blender binary to use (i.e., this argument is optional).
However, if that is not the case, you may want to specify a path to a Blender binary somewhere. You can do this with a simple argument "--blender-binary", like so:
# Invoke the Master
java -jar /path/to/FreddyRender.jar --master --port MASTER_PORT --blender-binary=/path/to/your/blender

# Invoke a Slave
java -jar /path/to/FreddyRender.jar --slave --host MASTER_IP --port MASTER_PORT --blender-binary=/path/to/your/blender
Temporary Directory
You can specify a temporary directory for the Master and Slave modes with the option "--temp-dir", like so:
# Invoke the Master
java -jar /path/to/FreddyRender.jar --master --port MASTER_PORT --temp-dir=/path/to/some/temp/directory

# Invoke a Slave
java -jar /path/to/FreddyRender.jar --slave --host MASTER_IP --port MASTER_PORT --temp-dir=/path


